ONOS Configuration Guide
- Tracy Yang
Configuring ONOS
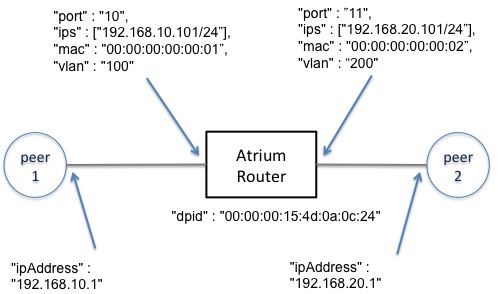
The distribution VM has taken care of most things necessary to configure and run ONOS. What still needs to be done is the routing application within ONOS. At this time, Atrium does not support the ability to change configuration at runtime, an issue which is known. Therefore, it is necessary to pre-configure the controller/app with router-interface addresses and expected BGP peers before launching ONOS. For an example configuration, please see the network shown below.
Figure 1
The configuration shown above needs to be entered in addresses.json and sdnip.json.
addresses.json, which is located in the folder Applications/config, is a file mainly used for ARP handling and router interface IP/VLAN config.
Figure 2
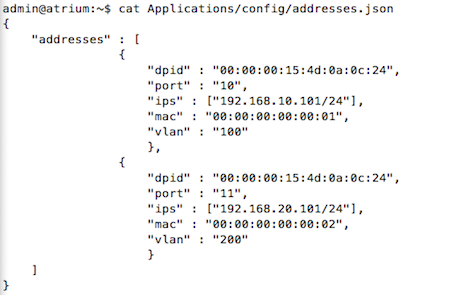
With reference to the topology diagram, the addresses of our router-interfaces are being specified. The "dpid" refers to the OpenFlow datapath-id of the data-plane switch, "port" refers to the data-plane switch port (the OpenFlow port number), "vlan" is one vlan-id configured on that port, "ips" are the set of ip-addresses assigned to that port/vlan, and "mac" is the mac-address assigned to that port.
A few things to note:
- To assign another vlan to the same port, user needs to create another block within the "addresses" array similar to the two shown above.
- The "mac" does not need to be the actual mac address of the physical switch-port. The "mac" does, however, have to be unique because this is what the router uses to reply to ARP-requests for its interface IPs (on that vlan).
- The "mac" can be the same for all port-vlans. In this case, user is essentially using a single "Router-MAC", which is used to reply to ARP-requests for any interface IP and the source-mac address on all Ethernet frames sent out of this router.
- Most switches do not have any dataplane restrictions on the use of "mac" addresses. However, Pica8 switches require the use of a single Router MAC (08:9e:01:82:38:68). See the example config files: Applications/config/pica_addresses.json and Applications/config/pica_sdnip.json
Applications/config/sdnip.json is addressed below.
Figure 3

"bgpPeers" refers to other routers connected to our Atrium router. These peers can be traditional routers or other Atrium routers. "bgpSpeakers" refers to our Atrium router (i.e there is only one bgpSpeaker).
For the "bgpPeers", the app needs to know two things: the IP address of the peer's interface and where it is attached on the Atrium router. In the example above, for peer1, the IP address of the peer's interface is 192.168.10.1, and it is attached to the Atrium router (attachmentDpid: "00:00:00:15:4d:0a:0c:24") on port 10.
For the "bgpSpeakers", the app needs to know the Atrium router's interface IP addresses in the "interfaceAddresses" section. (Do not change information under "bgpSpeakers" like "attachmentDpid" and "attachmentPort".)
Then, ONOS configuration is complete.
Launching ONOS for a Test
If launching ONOS for testing, user can run the following command from the shell (over ssh). If deploying the router, however, user should follow the instructions below.
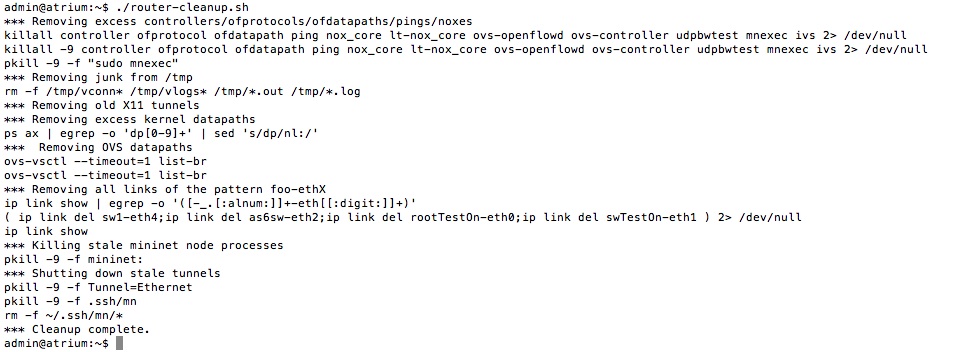
To ensure that there are no remaining processes left over from previous runs, please run "./router-cleanup.sh".
Figure 4
ONOS may already be running. Use the following command to ensure that ONOS has not started automatically.
admin@atrium:~$ onos-service localhost stopThen, to launch, run "ok clean" (onos-service start/stop can also be used to launch ONOS.)
Figure 5

To check, enter the command "log:tail" on the ONOS (karaf) CLI.
onos> log:tail
Scroll through the log and verify that the lines, like those in the figure below, can be seen.
Figure 6

The "Router dpid" should be the one the user just configured in the config files. The "Control Plane OVS dpid" will be explained in the next section.
User is now ready to configure Quagga.
Launching ONOS for Deployment
For deployment, it is best to launch ONOS within a terminal multiplexer like tmux because, among other things, tmux gives user the ability to maintain persistent working state on remote servers (in our case, on the distribution VM) while detaching and re-attaching at will.
For more on tmux, please see this tutorial.
While still connected via ssh into the distribution VM and having already configured the controller but before ONOS is launched, user should enter
admin@atrium:~$ tmux new
This command should bring up a window like the one shown below. Notice the "bar" at the bottom, identifying the tmux session.
Figure 7

Now, user can enter "ok clean" to launch ONOS (after running "./router-cleanup.sh" and possibly "onos-service localhost stop").
To detach from the window, enter 'Ctrl-b' followed by 'd'.
User can view the active tmux windows by typing:
admin@atrium:~$ tmux ls
0: 1 windows (created Thu Jun 25 17:39:27 2015) [109x36]
To reattach to the session:
admin@atrium:~$ tmux at -t 0
User is now ready to configure Quagga.
Related content
Copyright © 2025 Pica8 Inc. All Rights Reserved.